Conduit Shrinkage Chart
Conduit Shrinkage Chart - Web measure the distance to obstruction (l) and add shrink amount (chart below) for each inch of offset. That is how many 16ths of shrink. (2) bend distance, which is the horizontal length of the bend region. Remember to ignore the shrink when working away from the obstruction, but be sure to consider it when working into it. Indicates the back of a 90° bend. Add the “shrink amount”from the table on On the conduit, measure from the free end to be bent up the calculated number and mark the conduit. How to bend conduit & pipe with a bender. 4.5/5 (1,511 reviews) To find the shrink you must know the angle of the kick and put the center of that bend at the correct spot off the back edge of the 90. Figure 5 illustrates the geometry of the situation. Shrinkage (%)= (100−98 / 100)×100=2% this means the conduit has experienced a 2% shrinkage in length due to the change in temperature. Web determining shrink values for kicked 90s is the same as figuring for offsets. Plus you eliminate the need for costly conduit elbows when you make your own bends. Subtract distance between bends and mark point (x). This page incorporates a comprehensive conduit bending guide and describes how to bend an offset using multipliers. The cosecant of angle is the bend multiplier. Web multiplier per angle of bend (see table 2) to determine distance between bends. (2) bend distance, which is the horizontal length of the bend region. Your ideal bender has engineered features which include: Your ideal bender has engineered features which include: Measure the distance from the last coupling to the obstruction. (1) shrinkage, which is the reduction in horizontal length caused by the bend; Remember to ignore the shrink when working away from the obstruction, but be sure to consider it when working into it. Web conduit shrinkage refers to the shortening that. Klein tools has provided the correct stub height on each bender head. Remember to ignore the shrink when working away from the obstruction, but be sure to consider it when working into it. Figure 5 illustrates the geometry of the situation. For offsets, saddles and those special situations. Web when bending two or more offsets it is necessary to advance. Then make your bends at (x) & (y). Web these shrinkage multiplier values can be calculated using the calculator below by setting the radius to 0 and adjusting the angle. Measure the distance from the last coupling to the obstruction. Remember to ignore the shrink when working away from the obstruction, but be sure to consider it when working into. Your ideal bender has engineered features which include: Web conduit bending formulas ignoring bend radius. The first bend should be made at (c), put (star) or b at (c). (1) shrinkage, which is the reduction in horizontal length caused by the bend; A change in height does not effect the calculated shrink multiplier while the radius is set to zero. How do you calculate conduit shrinkage? If bending at 10 degrees, the conduit will shrink 1/16 for every inch of rise. Your ideal bender has engineered features which include: Add the “shrink amount”from the table on Web what is the conduit shrinkage—that is, the amount by which the center of the bend will be closer to the end of the. On the conduit, measure from the free end to be bent up the calculated number and mark the conduit. (2) bend distance, which is the horizontal length of the bend region. High strength ductile iron or light weight aluminum. If bending at 10 degrees, the conduit will shrink 1/16 for every inch of rise. There are two formulas that i. (2) bend distance, which is the horizontal length of the bend region. Mark the distance on the conduit (x). (1) shrinkage, which is the reduction in horizontal length caused by the bend; Web when bending two or more offsets it is necessary to advance the centers of the bends for the progressive conduits in order to maintain an equal center. Ed with stub, offset and outer marks. The code further specifies that the total of all bends in a conduit run must not exceed 360°. (1) shrinkage, which is the reduction in horizontal length caused by the bend; Klein tools has provided the correct stub height on each bender head. 4.5/5 (1,511 reviews) (1) shrinkage, which is the reduction in horizontal length caused by the bend; Web conduit bending formulas ignoring bend radius. Measure the distance from the last coupling to the obstruction. Web when bending two or more offsets it is necessary to advance the centers of the bends for the progressive conduits in order to maintain an equal center to center. Conduit is inserted into the bender's head and, following the specialized guides, the user will step on the foot pedal or use their hands to bend the metal pipe at. Web measure the distance to obstruction (l) and add shrink amount (chart below) for each inch of offset. Master bending measurements, calculations, techniques, and troubleshooting common issues with our comprehensive. On the conduit, measure from the free end to be bent up the calculated number and mark the conduit. Locates the center of a saddle bend. The first bend should be made at (c), put (star) or b at (c). Shrinkage (%)= (100−98 / 100)×100=2% this means the conduit has experienced a 2% shrinkage in length due to the change in temperature. Add this figure to the center of bend measurement of 1st conduit. Conduit is inserted into the bender's head and, following the specialized guides, the user will step on the foot pedal or use their hands to bend the metal pipe at. (1) shrinkage, which is the reduction in horizontal length caused by the bend; I personally use it when i am not in a rush and. We know that a = 4 and angle d = 22.5º. Subtract distance between bends and mark point (x). A change in height does not effect the calculated shrink multiplier while the radius is set to zero. How to bend conduit & pipe with a bender. How do you calculate conduit shrinkage? Keep in mind, when bending offsets, the conduit will shrink. (2) bend distance, which is the horizontal length of the bend region. Klein tools has provided the correct stub height on each bender head.
Electrical Conduit Math Math Encounters Blog

3/4 Emt Shrinkage Chart

Emt Conduit Bending Chart
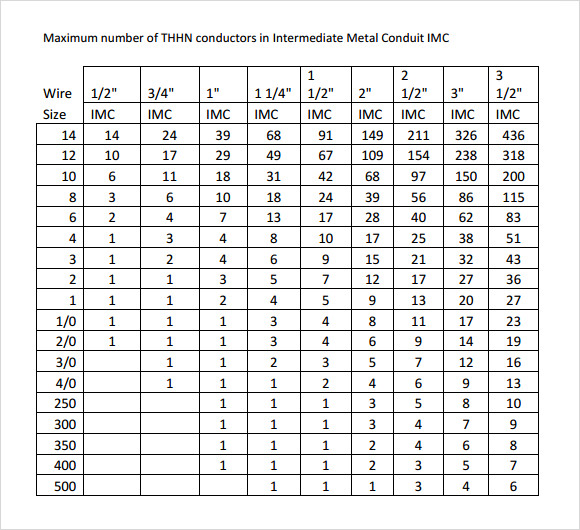
FREE 9+ Sample Conduit Fill Chart Templates in PDF

Rigid Conduit Dimension Chart

Emt Pipe Bending Chart
.png)
Emt Conduit Bending Chart
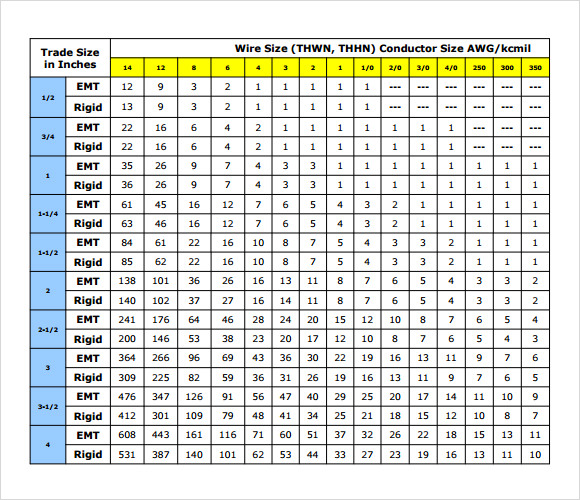
FREE 9+ Sample Conduit Fill Chart Templates in PDF

Electrical Conduit Math Math Encounters Blog

How To Bend Conduit change comin
Web These Shrinkage Multiplier Values Can Be Calculated Using The Calculator Below By Setting The Radius To 0 And Adjusting The Angle.
Your Ideal Bender Has Engineered Features Which Include:
For Instance For Shrink, Divide The Bend Angle By 7 And Round Your Answer.
Add The “Shrink Amount”From The Table On
Related Post: